Tuesday, October 6, 2015

Runtime Javascript anonymous functions

Javascript anonymous functions are function that are dynamically declared at runtime.
In other way function can be created without function name,
Javascript nomal function(with name) will be created using function declaration
But, Anonymous function uses function operator.


Here’s a example of a ordinary function:
  1. function abc()
  2. {
  3.   alert("Created by function declaration");
  4. }
  5. abc();
Here’s the same example created as an anonymous function:
  1. var abc = function()
  2. {
  3.   alert("Created by function operator");
  4. }
  5. abc()
Above code, anonymous function is assigned to a variable abc. Javascript function is also a object like any other object. Hence function objects also can be assigned or passed as parameter.


Sunday, October 4, 2015

Javascript prototype is easy

  1. Javascript prototype is quite fuzzy word for javascript developers in the beginning.
  2. Prototype is the property which is available for all javascript functions by default.
  3. This property helps to attain inheritance in javascript.
  4. As most of them  aware of classical inheritance concept i.e inherits the methods and properties from parent class.
  5. But, In javascript there is no class keyword to achieve inheritance.
  6. Javascript is function based object orient programming language.

Find the following simple snippet to understand prototype.

function abc() {
}

Prototype methods and property created for function abc

abc.prototype.testProperty = 'Hi, I am prototype property';
abc.prototype.testMethod = function() { 
   alert('Hi i am prototype method')
}

Creating new instances for function abc

var objx = new abc();

console.log(objx.testProperty); // will display Hi, I am prototype property

objx.testMethod();// alert Hi i am prototype method

var objy = new abc();


console.log(objy.testProperty); //will display Hi, I am prototype property

objy.testProperty = Hi, I am over-ridden prototype property

console.log(objy.testProperty); //will display Hi, I am over-ridden prototype property

Same way prototype methods can be overridden in the instance

Note: If you are still not able to understand please comment your query.

Sunday, September 6, 2015

Why Angular JS


  • Allows to write Single page application in better way.
  • Its a structural framework, to create dynamic web apps.
  • Uses HTML as template , let developer to extend HTML syntax.

Wednesday, July 15, 2015

Angular JS - What is $rootScope?

  1. $Scope is a javascript object associated to controller.
  2. Controller constructor function is responsible for setting the properties and methods to the $scope object.
  3. Methods and properties are created in the $Scope object are only accessed from the controller(Html view).
  4. $rootScope  is a javascript object which is parent of all $scope object.
  5. All other scopes are descendant scopes of the root scope.
  6. $rootScope object could communicate across the scopes.


<body ng-app="sampleApp">
    <div ng-controller="AppCtrl1" style="border:1px solid blue; padding:5px">
     Hello {{msg}}!
     <br />
     Hello {{name}}! (rootScope)
    </div>
    <br />
    <div ng-controller="AppCtrl2" style="border:1px solid green; padding:5px">
     Hello {{msg}}!
     <br />
     Hey {{myName}}!
     <br />
     Hi {{name}}! (rootScope)
    </div>
    <script src="angular.js"></script>

     <script>
     var app = angular.module('sampleApp', []);
     app.controller('AppCtrl1', function ($scope, $rootScope) {
     $scope.msg = 'World';
     $rootScope.name = 'Angular JS';
     });
     app.controller('AppCtrl2', function ($scope, $rootScope) {
     $scope.msg = 'Astute JS';
     $scope.myName = $rootScope.name;
     });
     </script>


Sunday, July 5, 2015

ExtJS - Simple ExtJS Grid

ExtJS Grid


As mentioned above, the job of  EXT JS grid to display the data and provides the functionality of the grid.
The purpose of the Ext.data.Store is fetching the data and maintains the data for the component.

Ext Data Model

Ext.data.Model represents the data model or data structure of  Ext.data.Store.


Ext.define('Employee', {
    extend: 'Ext.data.Model',
    fields: [ 'name', 'designation', 'age' ]
});

Ext Data Store
Ext.data.Store is the instance of data model Employee

var empStore = Ext.create('Ext.data.Store', {
    model: 'Employee',
    data: [
        { name: 'Sathish', email: 'sathish@example.com', phone: '555-111-1224' },
        { name: 'Vinod', email: 'vinod@example.com', phone: '555-222-1234' },
        { name: 'Nagamuthu', email: 'naga@example.com', phone: '555-222-1244' }
    ]
});

Now Ext.data.Model Employee and Ext.data.Store is available to populate the data in Ext.grid.Panel.

Following snippet explains how to make use of Ext.data.Store  to display the data in Ext.grid.Panel.

Ext.create('Ext.grid.Panel', {
    renderTo: Ext.getBody(),
    store: empStore,
    width: 400,
    height: 200,
    title: 'Employee details',
    columns: [
        {
            text: 'Name',
            width: 100,
            sortable: false,
            hideable: false,
            dataIndex: 'name'
        },
        {
            text: 'Designation',
            width: 150,
            dataIndex: 'designation',
            hidden: true
        },
        {
            text: 'Age',
            flex: 1,
            dataIndex: 'age'
        }
    ]
});


ExtJS Simple Grid Sample

Thursday, July 2, 2015

ExtJS - Border Layout

  • Border layout allows you you to create a layout based on the regions.
  • Layout needs to be allocated as regions
  • Typical ExtJS application has border layout has initial layout

    Following are the  regions defined in border layout
    • East
    • West  
    • Center - Main Content
    • North  - Header
    • South  - Footer
     
              {  id:'border-panel',
                title: 'Border Layout',
                layout: 'border',
                bodyBorder: false,
                defaults: {
                    collapsible: true,
                    split: true,
                    animFloat: false,
                    autoHide: false,
                    useSplitTips: true,
                    bodyStyle: 'padding:15px'
                },
                items: [{
                    title: 'Footer',
                    region: 'south',
                    height: 150,
                    minSize: 75,
                    maxSize: 250,
                    cmargins: '5 0 0 0',
                    html: '<p>Footer content</p>'
                },{
                    title: 'Navigation',
                    region:'west',
                    floatable: false,
                    margins: '5 0 0 0',
                    cmargins: '5 5 0 0',
                    width: 175,
                    minSize: 100,
                    maxSize: 250,
                    html: '<p>Secondary content like navigation links could go here</p>'
                },{
                    title: 'Main Content',
                    collapsible: false,
                    region: 'center',
                    margins: '5 0 0 0',
                    html: '<h1>Main Page</h1><p>This is where the main content would go</p>'
                }]
            },


Wednesday, July 1, 2015

ExtJS - Anchor Layout

  • Extjs Provides anchoring of contained items to the container's edges.
  • This type of layout is most commonly seen within FormPanels (or any container with a FormLayout) Fields are sized relative to the container without hard-coding their dimensions.

{
            id:'anchor-panel',
            title: 'Astute Anchor Layout',
            layout:'anchor',
            defaults: {bodyStyle: 'padding:15px'},
            items: [{
                title: 'Astute Panel 1',
                height: 100,
                anchor: '50%',
                html: '<p>Width = 50% of the container</p>'
            },{
                title: 'Astute Panel 2',
                height: 100,
                anchor: '-100',
                html: '<p>Width = container width - 100 pixels</p>'
            },{
                title: 'Panel 3',
                anchor: '-10, -262',
                html: '<p>Width = container width - 10 pixels</p><p>Height = container height - 262 pixels</p>'
            }]
        }

ExtJs - Accordion Layout


  • Extjs provides the layout property to achieve the accordion Menu.
  • Defining layout as Accordion and adding elements is enough to make accordion menu.
  • There  is no extra configuration for accordion menu.

            {
            id: 'accordion-panel',
            title: Astute Accordion Layout',
            layout: 'accordion',
            bodyStyle: 'background-color:#DFE8F6', 
            defaults: {bodyStyle: 'padding:15px'},
            items: [{
                title: 'Astute Introduction',
                tools: [{type:'gear'},{type:'refresh'}],
                html: '<p>Here is some accordion content.  Click on one of the other bars below for more.</p>'
            },{
                title: 'Astute Basic Content',
                html: '<br /><br /><p>More content.  Open the third panel for a customized look and feel example.</p>',
                items: {
                    xtype: 'button',
                    text: 'Show Next Panel'
                }
            },{
                id: 'acc-custom',
                title: 'Astute Custom Html Panel ',
                html: '<p>HTML Content</p>'
            }]
        }

ExtJS - Absolute Layout

  • Absolute is the simple layout that allows to position the component inside the container.
  • Basically it applies the css absolute property to the component.
  • Provides the configuration to position the container.

      {
            id: 'absolute',
            title: 'Astute Absolute Layout',
            layout: 'absolute',
            defaults: {
                bodyStyle: 'padding:15px;',
                width: 200,
                height: 100,
                frame: true
            },
            items:[{
                title: 'Astute Panel 1',
                x: 50,
                y: 50,
                html: 'Astute  - Positioned at x:50, y:50'
            },{
                title: 'Astute Panel 2',
                x: 125,
                y: 125,
                html: 'Astute  - Positioned at x:125, y:125'
            }]
        }
 

ExtJS - Lazy Instantiation(xtype)

  • Every component has the alias name in ExtJS.
  • Alias name are used to create the instance of the component.
  • Alias name to be provided in the component property xtype.
  • By creating components using xtype will help us to create the instance of the component when required.
  • In large applications, This is the ideal way to create the components.

         Ext.create('Ext.tab.Panel', {
        renderTo: Ext.getBody(),
        height: 100,
        width: 200,
        items: [
            {
                xtype: 'panel',
                title: 'xtype Panel',
                html: 'Panel created using xtype',
                listeners: {
                    render: function() {
                     
                    }
                }
            }
        ]
    });


Tuesday, June 30, 2015

ExtJS - Component Model


ExtJS Component Hierarchy

  • Viewport in the base component that contains container and components .
  • Container is a special type of component that holds other components.
  • Components inside containers will be nested by tree like structure.

var p1 = Ext.create('Ext.panel.Panel', {
    title: ' Panel 1',
    html: '1 Panel'
});

var p2 = Ext.create('Ext.panel.Panel', {
    title: ' Panel 2',
    html: '2 Panel'
});

Ext.create('Ext.container.Viewport', {
    items: [ p1, p2 ]
});


ExtJS - Custom Events

  1. In Extjs , Our own custom events can be added to the component.
  2. Custom events will be fired explicitly, when required.
  3. The execution of custom events will be done by fireevent().
  4. Following code illustrates the situation

var button = Ext.create('Ext.Button', {
    renderTo: Ext.getBody(),
    text: "Fire custom event",
    listeners: {
        customEvent: function(button) {
            Ext.Msg.alert('Custom event called');
        }
    }
});

 button.fireEvent('customEvent', button); 


ExtJS - Remove Listeners

  • As adding the listeners , Listeners can be removed from Extjs.
  • Calling function ON() with the event will be creating the event.
  • Below example explains how to remove the listener using UN() method.

var sayHello = function() {
   alert('Hello');
};

var button = Ext.create('Ext.Button', {
    renderTo: Ext.getBody(),
    text: 'Say Hello',
    listeners: {
        click: sayHello,
    }
});


button.un('click', sayHello);


ExtJS - What is Ext.defer?


Ext.defer or Ext.function.defer is a function similar to javascript setTimeout function.

Ext.defer(function() {
   alert('Hi')
 },  1000) ;

The function given in the defer will be executed after the number of millisecond specified.


Below are the arguments for Ext.defer
( fn, millis, [scope], [args], [appendArgs]


Monday, June 29, 2015

ExtJS - On function

  • ON is the function used to create a listeners for the component.
  • The usage of ON is , allows you to create the listeners later.
  • We can add the listeners for already instantiated components.

var button = Ext.create('Ext.Button', {
    renderTo: Ext.getBody(),
    text: 'Button'
});

button.on('click', function() {
    Ext.Msg.alert('Event listener called from [on]');
});


ExtJS - Event Listening

  • ExtJS few events will be fired without user action like afterrender.
  • There are events will be fired based on the user action like click, double click, mouseover etc.

Following code demonstrates , how to fire the event when user clicked.

Ext.create('Ext.Button', {
    text: 'Click me to call listener',
    renderTo: Ext.getBody(),
    listeners: {
        click: function() {
            Ext.Msg.alert('Listener function called!');
        }
    }
});


Same way multiple listeners can be added for same component

listeners: {
        click: function() {
            Ext.Msg.alert('Listener function called!');
        },

        mouseover: function() {
            //mouseover functionality
        }
    }


ExtJS - Events

Events

  • Events Fires , whenever some activity occurs in the components.
  • Following code has afterrender listener or event will be called after the   Ext.Component rendered.
   

 Ext.create('Ext.Panel', {
    html: 'Event Example',
    renderTo: Ext.getBody(),
    listeners: {
        afterrender: function() {
            Ext.Msg.alert('Panel is rendered');
        }
    }
});


Sunday, June 28, 2015

Extjs - Sencha Commands

Extjs Logo

Generate New application


   > sencha generate app -ext newApp /path/newApp


Create Build for existing application


     > sencha app build (inside app dir)


Start Sencha server


     > sencha web start (inside app dir)


Saturday, June 27, 2015

ExtJS Classes - OOPS

This article will explain you the  Ext JS’ concept of OOP and class-based programming.
  1. Classes and Instances
  2. Inheritance (polymorphism)
  3. Encapsulation 
  • ExtJS Object oriented programming


     Below Example to Understand EXTJS classes


     Parent Class calc

     Ext.define('calc', { //Define Key word to create Class in ExtJS
         x:0,
         y:0,
         constructor: function (config) {
             Ext.apply(this, config);
         },
         getSum: function () {
             return this.x + this.y;
         },
         getMultiplication: function () {
             return this.x * this.y;
         },
         getDivision: function() {
            return this.x / this.y;
         }
     });

    Child Class Add extends Parent calc

      Ext.define('Add', {
         extend: 'calc',
         add: function() {
             return this.getSum();
         }
     });


    Instance Created for class Add

     var sum = Ext.create('Add', {x:10, y:15});
     Ext.Msg.alert('Addition', sum.add()); 


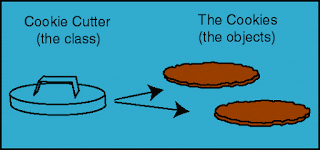
    Pictorial representation of Class and objects


Jacascript OOPs

  1. Javascript is Classless, prototype-oriented language.
  2. More flexible language and supports  Class-based programming.
  3. Class based programming always forces strong typing , encapsulation and coding convention.
  4. Class-based code is more likely to be predictable, extensible, and scalable over time.


It is important to be able to clearly distinguish between classes and instances. In simple terms, a class is the blueprint of a concept, while an instance is the actualization of the blueprint. Let’s look at some examples:

  • “Building” is a class, while the Empire State Building is an instance of “Building”.
  • “Dog” is a class, while Lassie is an instance of “Dog”.
  • “Computer” is a class, while the computer you’re using is an instance of “Computer”.

Advantages of EXTjs 5

ExtJS 5
  • Leading Standard for business grade web application
  • Rich UI components
  • One Stop for all rich UI Components
  • Cross browser compatibility
  • Advanced MVC Architecture
  • Plugin free charting
  • Modern UI Plugins
  • Two way binding
  • Routing Functionality
  • Deep linking
  • Build Tools
  • Full documentation suite
  • Built in Animation Support

Saturday, June 20, 2015

Advantages of Angular JS

  1. Data Binding - Angular JS provides two way binding is automatic synchronization of the data between model and view.
  2. Extensible - AngularJS is customized and extensible . Allows you to create customizable components.
  3. Code Reusability and Maintainability - AngularJS forces you to write code in modular way. Variables and functions can only be created to the respective component(Controller). Provides service and factory implemetation to use across the controllers.
  4. Compatibility - AngularJS is compatible to all major browsers
  5. Testing - AngularJS is designed to be testable so that you can test your AngularJS app components as easy as possible. It has dependency injection at its core, which makes it easy to test.

Tuesday, June 16, 2015

Angular JS Services

  •   In Angular, Services are the business logic can be shared across the controllers.
  •   Services needs to be injected(dependency injection) to make use of it in any component.
  •   Services instantiates only when component demands (Lazy instantiation).
  •   Services are Singleton, single reference shared across the components.
  •   Services can have their own dependencies similar  declaring dependencies in a controller.
 

  <body ng-app="myApp">
     <div ng-controller="myController"> {{message}} <br />
     <input type="text" ng-model="sqr" ng-init="sqr=5"> Square of      <b>{{sqr}}</b> =   {{squareCtrl(sqr)}}
     </div>
  </body>

 
  <script>
  var myApp = angular.module('myApp',[]);
 
     // Service logger to log
     myApp.factory("logger", function() {
       return function(v) {
          console.log(v);
       }
     });
 
     // Square service for square arithmetic operation
     myApp.factory("square", [ "logger", function(logger) {

       return function(v) {
         // Service looger dependency injected to this service   
         logger("Square root for : " + v);
          return v * v;
       }
     }]);
 
    myApp.controller('myController', ['$scope', 'square', function($scope, square) {
 
     //Property to the scope
     $scope.message = 'Hello!';
   
     //Behaviour to the scope
     $scope.squareCtrl = function(v) {
        return square(v);
     };
   
  }]);
  </script>


Monday, June 15, 2015

Angular JS - Nested Controllers

  •   In HTML DOM can be created in hierarchy(Parent and child DOM elements).
  •   Same way, Angular JS controllers also attached to the DOM hierarchy.
  •   Obviously these are the Nested controllers.
  •   The variable $scope will be created for the respective controller.
  •   Intresting point here is, The $scope variable will have the access to the  properties and methods to the higher $scope hierarchy.


 Nested Controllers

    <div ng-controller="ParentController" ng-app="nestedControllers">
    <p>{{prefix}} {{ctrl}}</p>

    <div ng-controller="ChildController">
      <p>{{prefix}} {{ctrl}}</p>

      <div ng-controller="GrandChildController">
        <p>{{prefix}} {{ctrl}}</p>
      </div>
    </div>
   

  $scope hierarchy

 
 <script>
    var myApp = angular.module('nestedControllers', []);
    myApp.controller('ParentController', ['$scope', function($scope) {
      $scope.ctrl = 'ParentController';
      $scope.prefix = 'I am'; //overrides in the child controllers
    }]);
    myApp.controller('ChildController', ['$scope', function($scope) {
      $scope.ctrl = 'ChildController';
    }]);
    myApp.controller('GrandChildController', ['$scope', function($scope) {
      $scope.ctrl = 'GrandChildController';
    }]);
</script>

Angular JS - Controllers

  •   In Angular JS Controller is the Javascript constructor function. 
  •   When directive ng-controller is added to the DOM, Angular create a   constructor function to the controller.
  •   And creates variable $scope to the respective controller.
 
  <body ng-app="myApp">
     <div ng-controller="myController"> {{message}} <br />
     <input type="text" ng-model="sqr" ng-init="sqr=5"> Square of      <b>{{sqr}}</b> = {{square(sqr)}}
     </div>
  </body>

 
  <script>
  var myApp = angular.module('myApp',[]);
  myApp.controller('myController', ['$scope', function($scope) {

     //Property to the scope
     $scope.message = 'Hello!';
   
     //Behaviour to the scope
     $scope.square = function(v) {
        return v * v;
     };

  }]);
  </script>

Sunday, June 14, 2015

Angular JS Data Binding

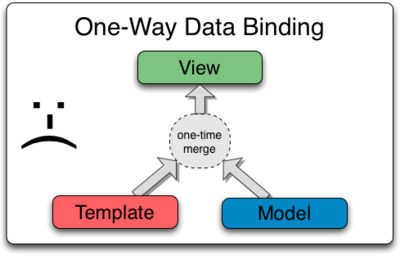
Traditional One Way Binding


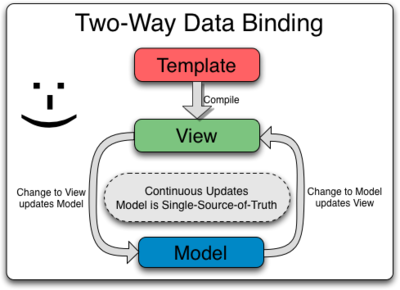
Angular JS Two Way Binding


  1. In Angular JS two way binding is automatic synchronization of the data between model and view. 
  2. Following sample will help you to understand better.

<body ng-app ng-init="firstName = 'Sathish'; lastName = 'kumar';">
  <strong>First name:</strong> {{firstName}}
  <strong>Last name:</strong> <span ng-bind="lastName"></span>
  Set the first name: <input type="text" ng-model="firstName"/>
  Set the last name: <input type="text" ng-model="lastName"/>

</body>


Above Code binds the value in the view {{ firstName}} and ng-bind="lastName", When value is entered in the following input box
   <input type="text" ng-model="firstName"/>
   <input type="text" ng-model="lastName"/>

In Angular JS two way binding  can be acheived without writing any javascript events on the DOM object.


  1.  ng-app - Defines the Angular JS template in the HTML markup for the application.
  2.  ng-init - Initialize the data in the give variable  .
  3.  ng-model  - Model is nothing but a variable stored in the scope.
  4.  ng-bind - Binds the model/variable data in the specified DOM.